Site Tools
Table of Contents
An introduction into General Architecture for Text Engineering (GATE)
1 About this Tutorial
This tutorial provides simple instructions on how to set up GATE and introduces some of the basic functionalities of the software. It is specifically targeted at beginner users using Windows, but most information is relevant for other operating systems as well. You can find further information on extensive features of the Gate architecture in the Gate user documentation(see also: 1).
GATE stands for General Architecture for Text Engineering. It enables the user to build processing pipelines for text processing with the aid of a GUI (Graphical User Interface). A large variety of plug-ins is available for GATE, including tokenizers, POS-tagger and syntax parsers. For further information on available plugins, read the following instructions.
2 History of Gate
The development of Gate goes 15 years back, when the University of Sheffield started a programme to design an application which “provides a common infrastructure for building LE [Language Engineering] systems […]. It is also a development environment that provides aids for the construction, testing and evaluation of LE systems (and particularly for the reuse of existing components in new systems)” (Cunningham et al., 1996b, p. 1).
3 Why use Gate?
The basic idea behind Gate is to facilitate the processing of data by using different processing tools like tokenizers, taggers and parsers as a framework to join different processing types and level out divergences in output and input formats. The aim of Gate however goes beyond simple POS-tagging by trying to cover advanced information extraction processes, like co-reference resolution, named entity extraction and thus as an application for coherence or cohesion extraction.
Gate can combine different types of standalone text processing tools like the Stanford tools or TreeTagger by Helmut Schmid, WordFreak-OpenNLP or the ANNIE framework. Each of which uses different types of input and output. However, Gate makes it possible to use them all.
4 Projects using Gate?
Due to its open character Gate can be used for a wide range of research projects. The BBC for instance currently uses Gate to extract and mine content information to enrich their database and link content extracted with Gate to references in their database. This was done with the 2010 Football World Cup pages and is also planned for the 2012 Olympics ( Gate, 2011) in London.
Another field of interest for Gate applications appears to be sentiment analysis, in which custumer support driven companies try to mine and extract information from blogs, twitter, forums, feedback etc. to monitor opinion development: “GATE-based systems are in use at several VoC [Voice of the Customer] suppliers, including a company that analyses customer feedback from some of the largest transportation organisations in the UK, and a New York customer sentiment startup” ( Gate, 2011).
5 Requirements for Gate
Written in Java, the Gate application can be used on any known operating system such as Windows, Mac OSX and Linux systems alike. In order to use Gate, you first have to check the installation of a current version of the Java JRE (it actually makes sense to install the JDK, which includes the JRE), which can be downloaded here.
Although previous versions seem to run into problems under Windows Vista, the majority of those seem to be fixed in recent versions (> GATE 6.1).
6 Installation
In order to use Gate for your processing task, you need to download and install the Gate environment suitable for your operating system which can be downloaded here. This process is very straightforward for the main operating systems (Windows, Mac OS, Unix), as there are precompiled executives which install all necessary files automatically.
You might consider downloading the GATE development snapshot, as the final release might not contain the latest features. But be aware that the development snapshot can still contain bugs that cause unexpected errors. In addition to that you will have to unpack, install and set the java class path to the GATE environment yourself.
7 Running Gate
The installation process will most likely have created shortcuts from which the application can be started. For Windows, you can run the application by browsing through the start menu and clicking the respective shortcut. After the loading process the following window appears:
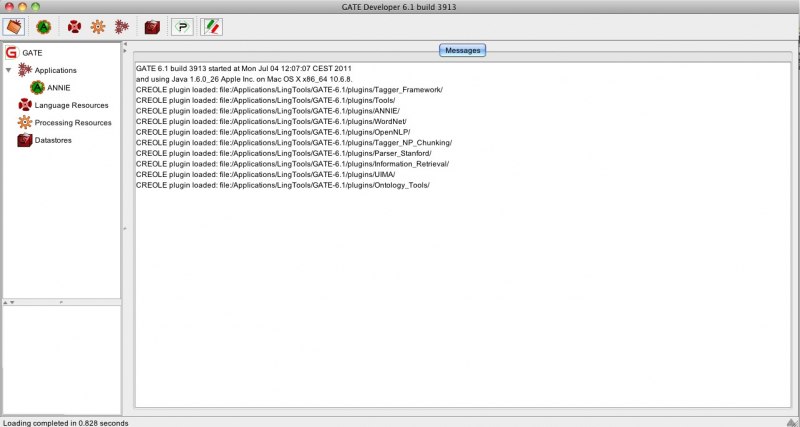
Screenshot 1: The GATE main window
In order to understand working with Gate, you have to understand the main components on the screen and how to use them. The appearing window contains three columns. Two on the left side and one for message window on the right side. Gate uses three different kinds of resources:
- Language Resources: Language Resources consist of the data you want to process with Gate. When you add a text file to Gate, it will appear in this column. You can create and add files to a certain group of language resources, if you want. Each language resource is separately processable.
- Processing Resources: Processing Resources are the basic components with which you want to process your data, contained in the Language Resource column. This column lists all the loaded Processing Resources currently available in the Gate core environment or manually loaded plug-ins.
- Applications: Applications are used to separate different types of Processing Resources. It basically contains ordered resources, manually created by the user. You can create as many Applications as you wish. Different kinds of Applications require different types of input and specifications. Depending on what kind of input you want to use or how you plan on creating your pipeline application you have different types of applications: “[…] A pipeline application can only be run over a single document, while a corpus pipeline can be run over a whole corpus” ( Gate, 2011)
7.1 Adding Language Resources
Data are stored as so-called Language Resources in the Gate environment. Usually, you will work with plain text files or XML files. In order to add a file to your current project, click menu File and select New Language Resource > GATE Document. The appearing window requires some information about the data you want to transmit to Gate in order to process it. First of all, all given options, except for the source file location, are optionally. However, in some cases it may be useful to specify the input encoding to prevent the application from creating errors, due to wrong encoding transformation. To do so, check each Processing Resource in your application for correct setting of input and output encoding ( Gate, 2011). If you want to process more than one text document, you can either create a Corpus Document by selecting it from the File menu, or add each text separately. You can change the properties of each element every time you want by double click the object you want to change. Property information about that object will be displayed on the right part of the window, where you can change each property.
7.2 Adding Processing Resources
Depending on your research question, you have to consider different ways of linguistic resources you are willing to add. Whether you want to create an ontology scheme or look for anaphoric co-references your pipeline will differ greatly. There are two systems already implemented, containing applications for name entity recognition: ANNIE and the WordFreak-OpenNLP tools. Both can be loaded either by selecting each processing element (tokenizer, POS-tagger, parser) under File > New Processing Resource or by using clicking File > Load ANNIE System (or Load OpenNLP System). NOTE: If you do not find any of these mentioned Systems or Processing Resources under the specified location, check if either or both of them are loaded into the Gate environment under File > Manage CREOLE Plugins.
7.3 Creating Applications
After loading all the Processing and Language Resources you need, you can create a pipeline application to process your data. In order to do so, click File > New Application and select the application best suitable for your needs: “Note that if a corpus pipeline is used, the corpus needs only to be set once, using the drop-down menu beside the 'corpus' box. If a pipeline is used, the document must be selected for each processing resource used” ( Gate, 2011).
An Application contains different Processing Resources, ordered sequentially to process the Language Resources. For instance for adding POS-tags to your text, an Application would look like this:
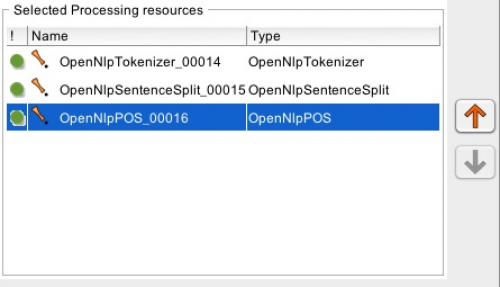
Screenshot 2: Application for POS-Tagging
As already indicated there are different types of Applications, which can be instantiated. Among basic corpus or text base pipelines you can also choose between general pipelines or conditional pipelines, which have attached a basic boolean or condition system to prove for instance the consistency or type of input from pre-processed tasks.
8 Named entity recognition for Mark Twain's Adventures of Huckleberry Finn
To understand best Gate's functionalities this tutorial exemplifies a possible pipeline by trying to annotate names and locations from Mark Twain's Adventures of Huckleberry Finn, chapter three, downloaded from the Gutenberg project website.
In a first step, we launch Gate and load the Language Resource into the open Gate environment (cp. section 7.1 Adding Language Resources). We enter the unique name for this file, so we can identify the content of the file. At this point it could be useful to think about saving your data in a datastore file, so you can save processed texts permanently. Furthermore, “the datastore functionality provides the option to save documents to disk and open them only one at a time for processing”( Gate, 2011). For further information on Datastores, read the following introduction.
In a next step, the required Processing Resources need to be loaded into Gate. For deploying named entity recognition software to our source text, we have to construct the processing chain of resources. Fortunately the ANNIE and WordFreak-OpenNLP system already provides out of the box systems to be applied for English texts (cp. Section 7.2 Adding Processing Resources). After loading all necessary Processing Resources, we need to construct our Application. If you used File > Load WordFreak-OpenNLP, a Corpus pipeline for the WordFreak-OpenNLP tools has already been created. Otherwise you have to create it yourself (cp. Section 7.3 Creating Applications). As we do not want to process a whole corpus, but only a single text file, we do not need a corpus pipeline, but a simple pipeline application will do the trick (cp. ibid.). After having created a new Application we open it by double clicking on the respective item on the left side. Now we only have to add each element to our Application in the correct order2 and specify the correct parameter. In contrast to a corpus pipeline, a pipeline application needs the text to be specified for each Processing Resource separately. In addition to that we enter the encoding to prevent encoding related errors. Your Application now should look like this:
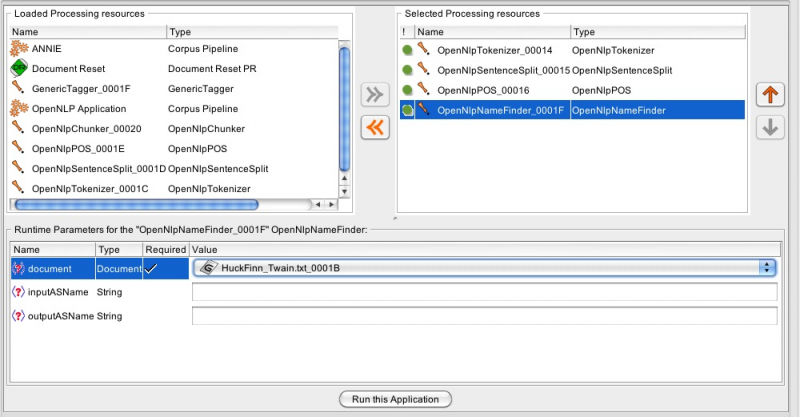
Screenshot 3: Setting up the processing Application
Clicking the Button Run this Application will process the specified text. When finished we can have a look at our processed text by clicking on it in the left panel. The raw text will be displayed. Annotations however are saved in an external XML format, which Gate uses as a layer on top of the text, referenced by a unique ID. Therefore annotations are not shown in line, but can be displayed either by selecting Annotations Sets and the desired element from the appearing list on the right. If you want to display all tokens and their corresponding tag for instance, you have to select Annotation Sets and Annotations List. The latter does not display a graphical representation as opposed to the Annotation Sets, but rather shows each token plus all information added during the processing (i.e. POS-tags), here displayed in the Features column.

Screenshot 4: Annotations List
In a final step, we need to check all the annotations and can change them, where necessary. By selecting Location, Organization, Person and Date out of the right panel, all annotations are displayed in the text column. Your text column should look like this:
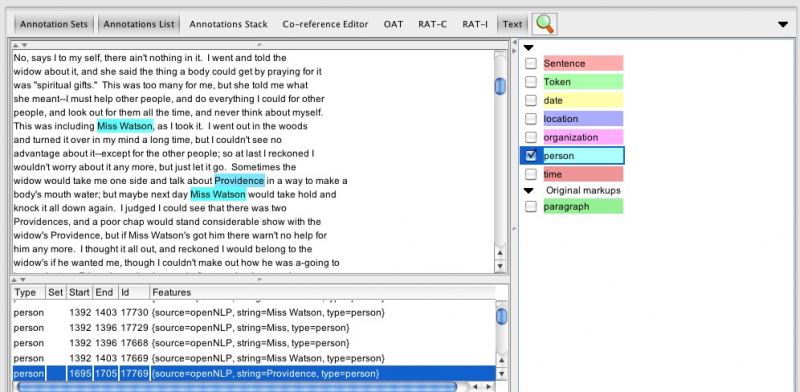
Screenshot 5: Annotated text and annotation panel
Often annotations are ambiguous, which can be useful, but most likely should be avoided. In our case the title and Person annotations overlap at the token Providence. As for these overlapping annotations, which we want to get rid of, we simply click on the refering annotation in the list on the right panel and the corresponding annotation in the text column and wait till the annotation window appears:

Screenshot 6: Annotation window
Now we can delete the annotation and exclude the overlapping Person annotation by clicking on the little pen with the smaller red cross on the left side of the annotation window. Among others you can adjust parameters, as the string or type of annotation or add a parameter yourself.
By checking the text for annotation failures, we observe a missing person annotation of the person's name “Miss Watson”:
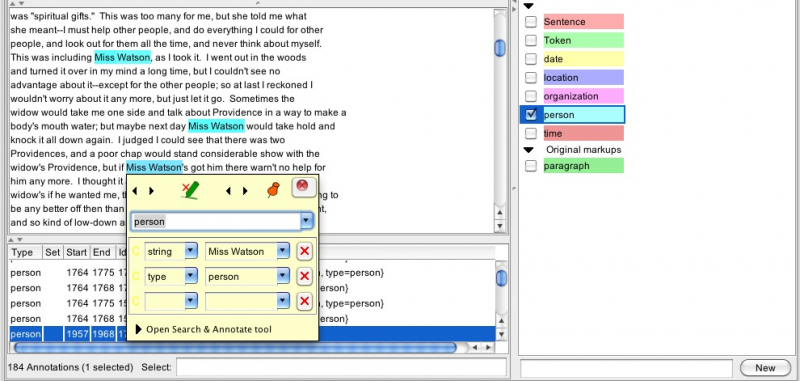
Screenshot 7: Missing annotation
In order to add the annotation we have to select the words and wait for a new annotation window to appear. Now we can select the predefined type “person” out of the select box and adjust all other parameters according to our needs. The result should look like this:

Screenshot 8: Add annotation
After adjusting all annotations we can extract the information out of the Annotations list and formulate an adequate analysis depending on your research question or hypothesis.
Of course this tutorial could only be a peak into the functionalities of the Gate framework, as its usage and usefulness highly depends on the research question of interest. For further information on how to further use Gate, please read the exhaustive documentation online.
References
%BIBTEX{topic=“LinguisticsReferences” select=“keywords : 'Gate'” sort=“author” rev=“off” errors=“off”}%
1 This document is based on a tutorial by Marcus Rohrbach (2008), which it updates and extends in terms of usability and recent developments for GATE.
2 If you do enter the Processing Resources in incorrect order you will definitely end up with processing errors, as each element in the sequence expects.
 Except where otherwise noted, content on this wiki is licensed under the following license: CC Attribution-Share Alike 4.0 International